|
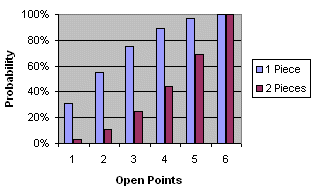
Dice rolls and probability in Backgammon The chances of rolling a particular number (or numbers) with two dice aren't always what they seem. For example, with just two points out of six to aim at, you have a 55% chance of getting back from the bar, while the chances of rolling a 1 are not 1 in 6, as it might appear, but nearly 1 in 3. Understanding the true probabilities of dice rolls can greatly improve your tactical play, by letting you accurately assess the risk of leaving blots, and the chances of hitting and covering points. It also helps you to play strategically, by telling you how to distribute your pieces around the board in order to make the largest number of potential dice rolls work well for you. Probabilities are the secret of why good players seem to get more 'lucky' rolls than beginners. Dice probabilities aren't based on complex mathematics, but simply on the number of dice combinations which give a particular result. For example, 15 of the 36 possible combinations allow you to move a piece 4 pips (points) around the board. All 36 combinations are equally likely to occur on each roll (unless the dice are loaded!), so on any roll there is a 41.66% (15/36) probability of getting a 4-pip move (covered points permitting). Some of these probabilities may seem unlikely, but the dice table below shows why they're true (enter the type of move(s) you want into the relevant box/list, then press 'Roll!'). Meanwhile the 'In practice' section in the right-hand column put theory to the test, by simulating 100 random dice rolls and seeing how many fit the result you've chosen. See the explanations below the dice table for details of what each type of
move means. | |||||||||||||||||||||||||||||||||||||||||||||||||||||||||||||||||||||||||||||||||||
|
Moving n pips. You (or your opponent!) need to move n pips to make a hit or cover a point. What are the chances of getting that move from the next dice roll? Choose the number of pips to move, then press Roll!: pips Multiple targets. You can hit (or get off the bar) if you move x or y (or z) pips. What are the chances of getting one of those on the next roll? Enter a comma-separated list of numbers (e.g. 1,4,12) below, chose the type of move, then press Roll!: (See below for details of what the above options mean) Some fixed odds:
|
The theory:
Direct and indirect moves
A direct move is a single move in the range 1 to 6, e.g. 13/8. An indirect move consists of two or more consecutive moves with a single piece, e.g. 13/10 10/8 from a roll of 3-2. All the moves must be legal (i.e. land on an available point). |
||||||||||||||||||||||||||||||||||||||||||||||||||||||||||||||||||||||||||||||||||
|
So what does it all mean?
The positions you leave your pieces in after each move influence two sets of probabilities:
Here are examples of how you'd use the probabilities shown in this page in a game. Moving n pips
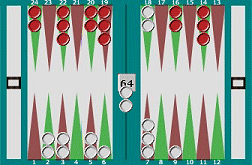
In this position (right), you've played 13/7, leaving a blot 6 points away from red's pieces on your 1-point (so red has a '6 point shot' at you). Choose 6 from the drop-down list in the 'Moving n pips' section, and press Roll! You'll see that 17 out of the 36 possible dice combinations yield a direct or indirect move of 6 points, giving a 47% probability that red will be able to hit you next time if they want to. Try the calculation for a 4 point move and you'll see that the percentage is 41% (15 rolls). So if you'd left the blot closer to red's pieces (on your 5-point), there'd be marginally less chance of being hit. There's a table of probabilities for moves from 1 to 24 pips at the bottom of this page.
Multiple targets - Direct and Indirect moves Consider this position, from the sample game. It's white to roll. Red's left a blot on white's 7-point, and white has three direct shots at it (6, 4, and 1 points away) plus an indirect shot 7 points away. Type 7, 6, 4, 1 into the Multiple Targets box above, choose 'Direct and indirect moves' from the drop-down box, and press Roll! As you'll see, the dice table lights up - there's an 86% probability of white being able to hit red from one of those four points. So red was taking a big risk in trying to get that piece out of white's home table. Whether to actually hit or not is, of course, a different question, based on the risks and benefits that would result. That's a whole new set of calculations! In this game, white rolled 4-1 and played 11/7* 7/6. Multiple targets - Direct moves only
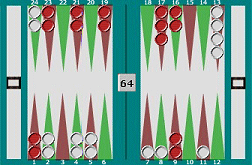
In this position (right) you're on the bar, and there are just two open points in your opponent's home table (top left of board). Type 2,4 into the Multiple Targets box above, choose 'Direct moves only' from the drop-down box, and press Roll! You'll see that there's a 55% probability (20 rolls out of 36) that you'll get back on. That may seem counter-intuitive, but press Roll! a few times, check the random rolls results, and you'll see that, on average, around 55% of dice rolls really do include a 2 or a 4. The percentage is the same for any two numbers (1 and 3, 5 and 6, etc) - try
them and see. It's the number of numbers that count - try adding a third number
(say, 2,4,5) and you'll see the percentage rise to 75%. Multiple targets - Two Direct moves
This time you've got two pieces on the bar, and again two open points to aim at. Type 2, 4 into the Multiple Targets box above, choose 'Two Direct moves' from the drop-down box, and press Roll! Your chances of getting both pieces back on with one roll are 11% - 4 rolls out of 36. Add a third number to the target point list and the percentage goes up to 25%, or 9 rolls out of 36. (Keen mathematicians will have spotted that the roll-count is the square of the number of target points, i.e. 1, 4, 9, 16, 25, 36!) To get three or four pieces off the bar in a single roll you need a double (and anyway, what are you doing with three or four pieces on the bar in the first place?!). Your chances therefore range from 3% (1 target point) to 17% (six target points). Two Direct moves, no doubles
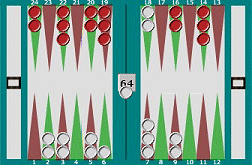
Here you want to cover your six-point. To do so you'll need to move two pieces, so an indirect shot from 13 isn't possible. Basically you need to make direct moves with two out of the three pieces on 7, 8 and 11. What are the chances? Type 1,2,5 (the distances between the 6-point and the three outfield pieces) into the Multiple Targets box above, choose 'Two Direct moves, no doubles' from the drop-down box, and press Roll! The result is a 16% (6 rolls out of 36) probability of getting two moves onto the six-point from 1, 2 and 5 points away - disappointingly low. Even if you choose 'Two Direct Moves' (allowing doubles), it only increases to 25%. Contrast that to the whopping 75% chance of getting one piece onto your 6-point from this position ('Direct and indirect moves'). The lesson of this is that to capture specific points you have to take risks by moving single pieces onto them as 'builders' (but also as blots), then covering them next time. The chances of the ideal, point-covering roll coming along are too small to wait around for it. This is why you see experienced players (and computer programs) making what look like reckless moves - they know they have to, in order to stand a good chance of building a position. Pip gaps - covering points from the outfield.
Type 2 into the Multiple Targets box above, choose 'pip gap' from the drop-down box, and press Roll! You'll see that 10 rolls out of 36 (28%) allow you to move pieces from points two pips apart and cover a third point. Which point you cover varies with the roll - 3-5, for example, would let you move 6/3 8/3 - but at this stage all possible destinations are open, so that's OK.
To add doubles to the calculation (allowing you to move two pieces from a single point), add a 0 to the list of gaps (e.g. 0,2 and 0,1,2,3). The percentages are then 39% and 83%, still a big increase. The lesson of this section? Like the last one - you need builders, and you need them spread out. By increasing the number of different pip-gaps you have within striking range of your home table, you massively increase the chances of making points there. This is why 'candlesticking' - stacking lots of pieces on a single point - is such a bad tactic. It reduces the range of pip gaps you have, and thus the number of rolls that will let you cover a point. Although these examples concentrate on the home table, pip-gaps are relevant in any part of the table. In fact the first thing to do after you've rolled is compare the difference in the numbers rolled with the pip-gaps you have around the table. This will tell you what (if any) opportunities you have for capturing an empty point.
About sequences of rolls... This contrasts with the real differences in the probabilities of being able to make particular moves from a dice roll. The probability of being able to move 6 points is 47%, whereas the probability of being able to move 2 is 33%, simply because more of the 36 possible dice combinations add up to 6 than add up to 2. That doesn't mean that either outcome will occur in any particular roll, of course (in fact the odds are against both of them). It just means that, over a long period of time, one will probably occur more often than the other. When they do occur, it will be at random intervals. Check the random test results for something with a 30% probability (e.g. 'Moving n pips' with a value of 1), and you'll see that it doesn't occur neatly every three rolls or so, but often in little clumps with longer gaps in between. Seen this way, random distribution seems perfectly normal (in fact a neat, regular distribution would look suspicious). It's when we experience a particular chunk of it ("I went six rolls without throwing a 1 or 3") that we perceive it as good or bad luck. So what does all this mean? Basically, that the probabilities of future dice rolls are your only weapon against the random, 'luck' element of backgammon (the dice). Don't try to see patterns in previous rolls, because even if they exist, they're no indication of future outcomes. Above all don't let 'bad' luck (e.g. your opponent's run of 6-5s) affect your judgement - keep reminding yourself that this is just the way random outcomes work, and concentrate on the real probabilities of the next roll. Sometimes you'll get hammered, but if you make the right decisions then overall you'll succeed more times than you fail. * Doubles are different, in that there's less probability of rolling them than non-doubles (2.7% for a particular double, e.g. 2-2, against 5.4% for a particular non-double, e.g. 3-2). The probability of rolling any double is 16.6%, and the probability of rolling a non-double is 73.4%. So if your opponent rolls 6-6, 2-2, 3-3, 5-5 then they actually have had an improbable run of luck.
And having said all that... Most people (including me!) start off playing backgammon purely tactically, living from move to move and wondering why more experienced players run rings round them. The answer is that their opponents are playing strategically (back game, running game, etc), assessing their tactics for each move in the context of the greater plan. In that context a seemingly weak move can, in fact, be a strong strategic one. For example, exposing a blot in the more vulnerable of two positions might be a worthwhile gamble if the prize is a better chance of building a six-point prime and locking your opponent's back pieces in. For a strong player, next-roll probability is just a contributory factor in deciding the next step in the game strategy. As your game improves, you'll start to think that way too - but you'll need to learn the basic probabilities first.
|
|||||||||||||||||||||||||||||||||||||||||||||||||||||||||||||||||||||||||||||||||||
|
Some statistics to learn off by heart (well, try to
remember, at least!) Chances of moving n points in a single roll.
(or to put it another way:) 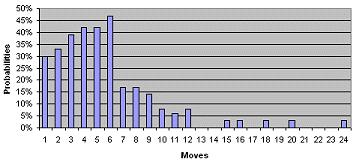 (Note that the scale of this chart only runs to 50% - even the most likely move (6) is odds-on not to occur).
(or to put it another way:)
|
|||||||||||||||||||||||||||||||||||||||||||||||||||||||||||||||||||||||||||||||||||
 This is the simplest (and
arguably most important) set of percentages to remember - what are the chances
of being able to make a move of n pips (points) on the next dice roll?
Just knowing these can help you to avoid putting your pieces in unnecessary
danger, and makes a good start to understanding more complex probabilities.
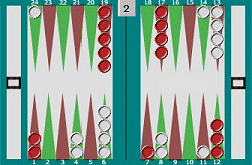 This is a multiple-choice
version of Moving n pips - what are the chances of getting a move of
either x, y or z pips from the next roll? In practice, what
it most often means is 'what are the chances of hitting point n when I
have pieces x, y and z pips away from it?'
 This is mainly
about getting back on from the bar, although it can also apply where blocked
points make indirect moves impossible. In the case of the bar, the question is
the other way round from the previous section - 'what are the chances of
directly hitting a point that is either x, y or z pips away
from the one I'm on?'
  This is mainly
about your chances of getting two pieces off the bar in one roll, although it
also applies where you're trying to cover a point (move two pieces onto it), and
you have shots from points that contain more than one of your pieces (so you can
include doubles in the range of possible rolls).
 This section is about
trying to cover a particular point (move two pieces onto it), when you have two or more
points within range, each of which has only one of your pieces on it (or from
which you only want to move one piece). In this calculation doubles can't count
as possible rolls.
 This is similar
to the previous section, but with one major difference - it concerns your
chances of being able to cover any point (not just a particular one) in a single
roll, using the pieces you have waiting. It's about the gaps (distances) between
the points where you already have pieces, and far from being a long-shot, it's
the bread-and-butter of play in the early stages of the game, when the table is
still wide open and there are lots of points up for grabs.
 For example, you
start the game with pieces on points 6 and 8, two pips apart. If you roll two
numbers which differ by 2 (e.g. 3-1), then you'll be able to move a piece from
each point and cover a third point in your home table - like this move of 6/5
8/5 from a roll of 3-1:
 Now consider this
position. The extra piece on your 9-point means that you now have pip-gaps of 2,
3 and 1 (the latter the gap between 8 and 9). Type 2,3,1 into the Multiple
Targets box and press Roll! again. The chances of covering a point on the next
roll have rocketed to 75%. Even discounting 3-2 (which would just add to the
stack on your 6-point), that's still a massive increase for just one extra piece
in play.